Jandy.dev Tech Stack
Motivation
The reason I created jandy.dev was to showcase the skills I’ve acquired throughout my career in development and DevOps while building a platform to document my projects, learning experiences, and personal journey. I’ve found that the best way to solidify new knowledge is by teaching it or explaining it in my own words. This process not only reinforces my understanding but also helps others who might be on a similar learning path. To wrap up with a quick foreword, this implementation took me a good amount of time to troubleshoot and get working. If you are following this as a guide to copy the Tech Stack, be prepared for some extra troubleshooting, I'm sorry if anything here is not clear. Reach out via the form in the About Me page if you have a question.
Tech Stack
Cloud Services - Google Cloud
- Cloud Run – Serverless containerized application hosting, integrated with GitHub for CI/CD.
- Cloud Build – Automates build and deployment workflows.
- Cloud SQL (Postgres) – Managed PostgreSQL instance for database storage.
- Cloud Storage – Stores images and other static assets.
Version Control & Automation - GitHub
- GitHub Repository – Version control.
- GitHub Actions – Automates workflows, including deploying assets to Cloud Storage and saving Docker Image to Dockerhub.
Containerization - Docker
- Dockerfile – Defines the containerized environment for deployment and CI/CD execution.
Backend & Web Framework - Vapor (Swift)
- Swift
- Leaf – Server-side HTML templating engine.
- Fluent – ORM for PostgreSQL database integration.
- CSS
- JavaScript
Implementation
Vapor Setup
I chose to utilize the Vapor framework for swift, because I grew really comfortable with Swift from my two IOS projects, plus the documentation is very clear and concise (Link for context, Vapor Docs). I'll save the explanation for how to setup and get a Vapor app up and running as it is in their documentation and I really didn't experience any hiccups along the way. In order to setup the Google Cloud section I am assuming you have the basic vapor template project up and running, the rest I'll explain later.
Google Cloud
Setting up Cloud Run to work with Github is super easy which is nice. Just login to your Google Cloud Console, select Cloud Run, and click on the "CONNECT REPO" button. 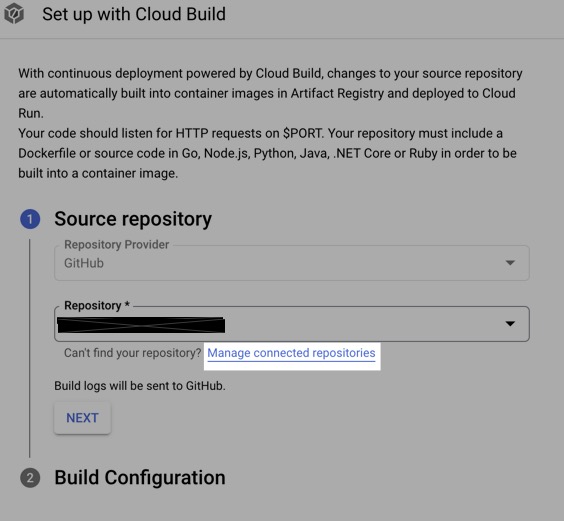 Then you will be prompted for a connected repository, assuming you have not set one up yet then click the "Manage connected repositories" button to link you GitHub repository.
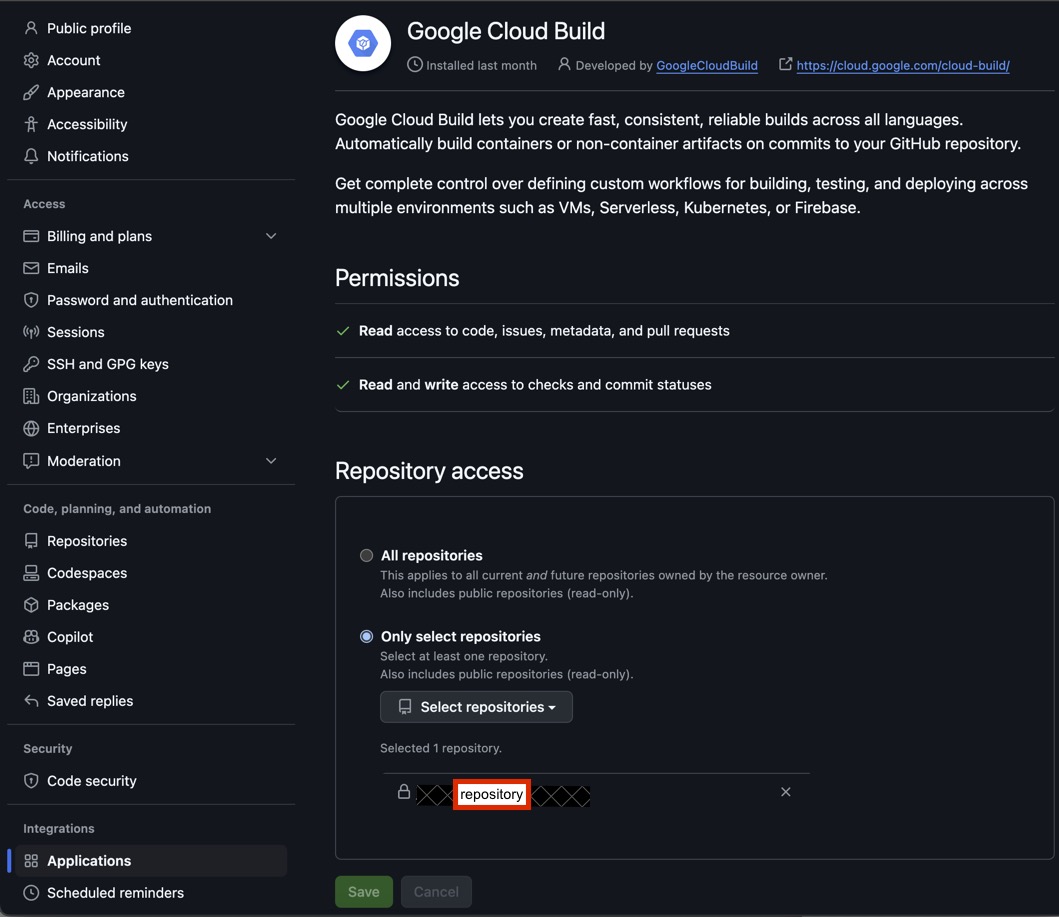
  This will prompt you to log into you GitHub account. Once logged in select your repository that you want to share and click save.
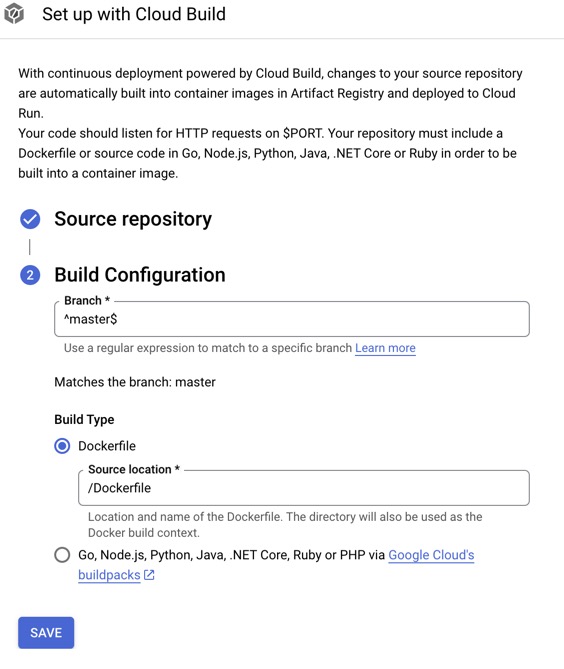
  Once you have shared the repository it should show up in the Cloud Build side window under the repository dropdown then hit next. Then you should type in the branch that you want the CI/CD pipeline to run on. In my case it is the "^master$" branch of my repository, since this project is an individual endeavor I really only have a development and master branch at the moment. Choose to build based off a Dockerfile contained in the repository since Vapor provides a basic Dockerfile in their template project that handles almost everything we need and click save. The rest we will handle on the Cloud Run side later.
  We should now be taken back to the main window with the Cloud Run configuration showing.
 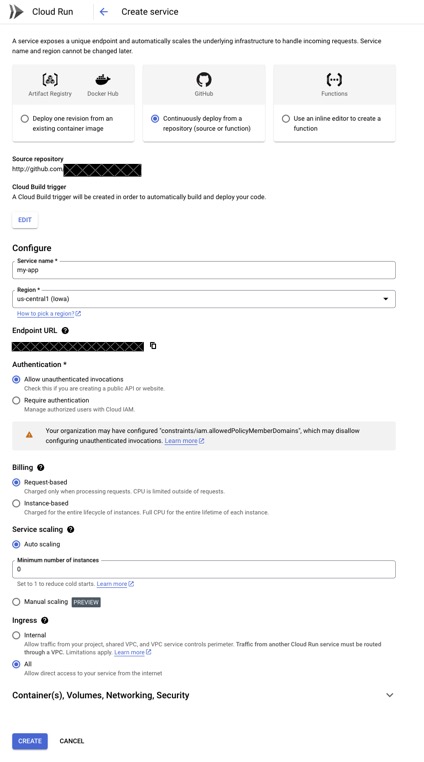 Fill in all the configuration detains that you require, the only one to be aware of is the "Allow unauthenticated invocations" which is required if you are trying to host a public website. Click create and the Cloud Build Trigger function should be automatically created. Once the Cloud Build has completed it should deploy the container that was managed by the Dockerfile in the connected GitHub repository.
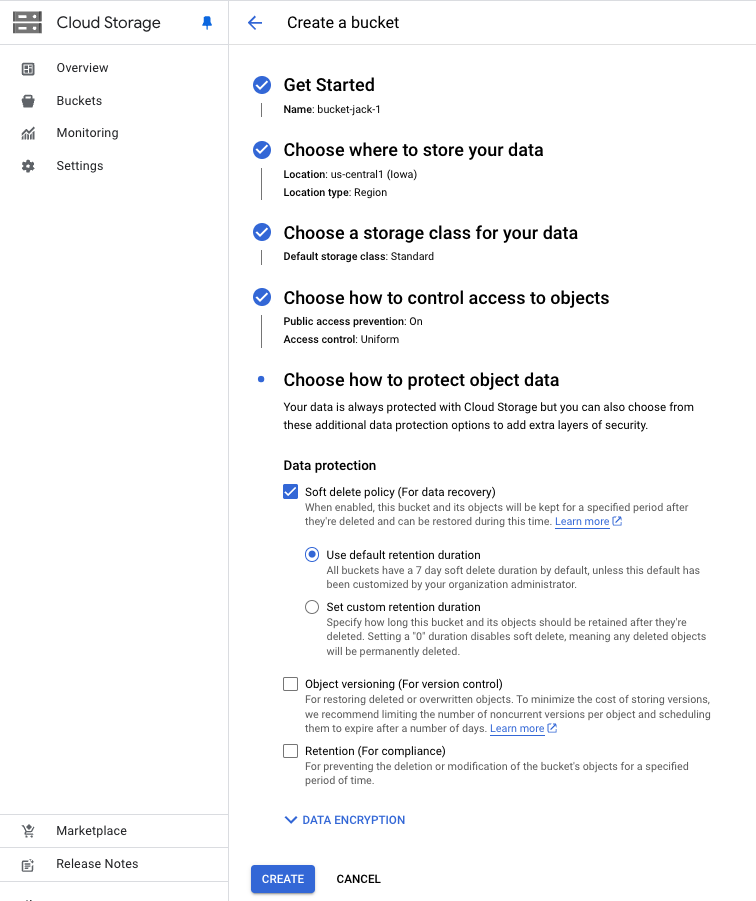
Now that the Cloud Run is deploying we can take the time to set up our Cloud Storage Bucket and our Cloud SQL PostgreSQL instance. Go back to your Google Cloud Dashboard and select Cloud Storage. Create a new bucket, for mine I chose a lower costing tier which is to just have a single region in the same region as my Cloud Run instance to minimize latency. Leave the public access prevention "On" as we are going to mount this bucket to our Cloud Run container later.  Cloud SQL is next, go to the Cloud SQL instances page and select PostgreSQL. The Fluent ORM included in the starter template for Vapor has a PostgreSQL driver that makes connecting, creating data and tables, and querying our data very easy.
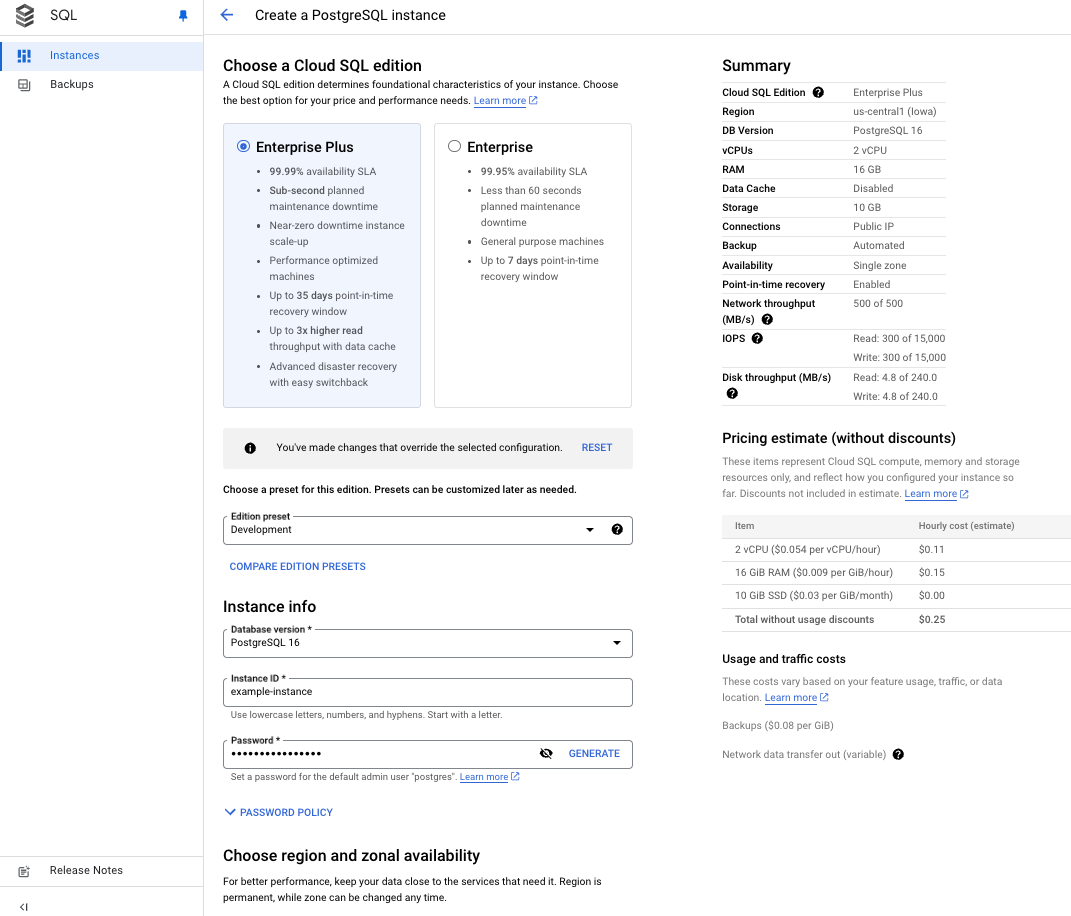
  Create a new instance again, I chose a single zone lower costing instance in the same region as my Cloud Run and Cloud Storage instances. Be sure to save the Password somewhere as it will be needed to add as an environment variable to our Cloud Run container
  Now that we have provisioned all the Cloud Resources that we need to build out our stack we need to attach them to the Cloud Run container. Note these instances may take 20 minutes or so to fully provision into a state where they can be attached and configured. Go back into your Cloud Run instance and click on "EDIT & DEPLOY NEW REVISION" to modify our container settings.
 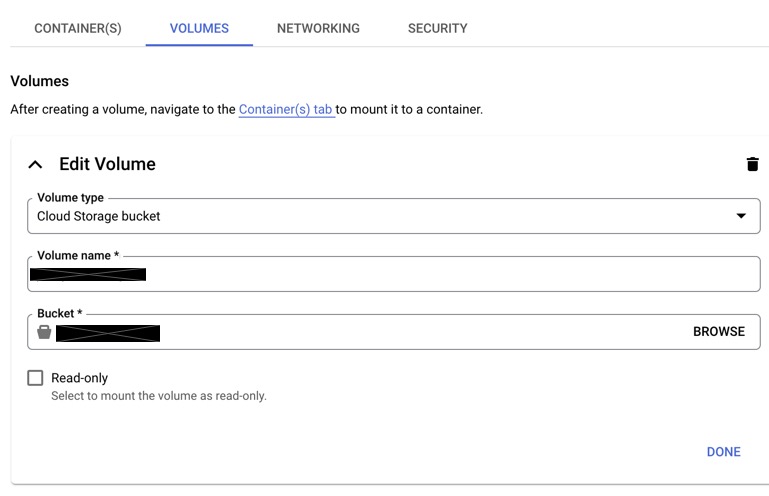 This is where you want to go into the "VOLUMES" tab in order to link the Cloud Storage instance. Under volume type select "Cloud Storage Bucket," name you volume appropriately and attach the bucket that you created. Click done and the go to the "CONTAINER(S)" tab.
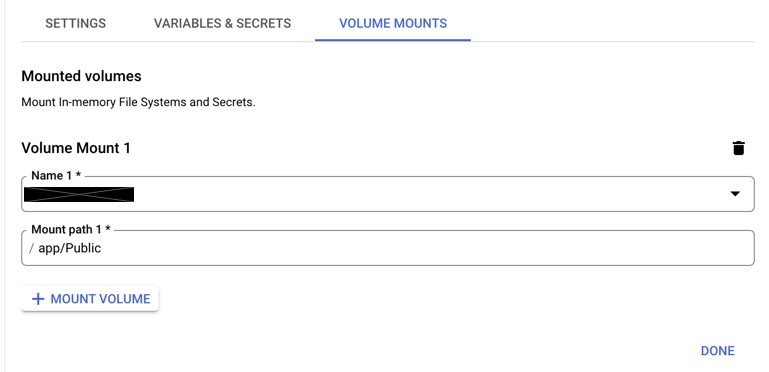
  Since you just created the volume it should show up under the dropdown for name. Make sure to mount it to "/app/Public" or wherever middleware is serving your public files from in your configure.swift in Vapor. If you have no clue what I'm talking about just go with the suggestion above and I'll go over the full Vapor configuration later. Click done to add the mount. With this mount in place you have now created essentially a docker volume on your container which is used to persist files. If you choose not to use a volume every time you change file in your apps public directory you will have to rebuild the entire container. When thinking about building a Blog site that I was going to add many images, videos, etc too this seemed like an unwise choice, and we all know not to store images as binary in our database.
  With this we want to go back to the main container configuration page and scroll all the way down to look for Cloud SQL connections. The dropdown should show the instance that you just created, add the connection.
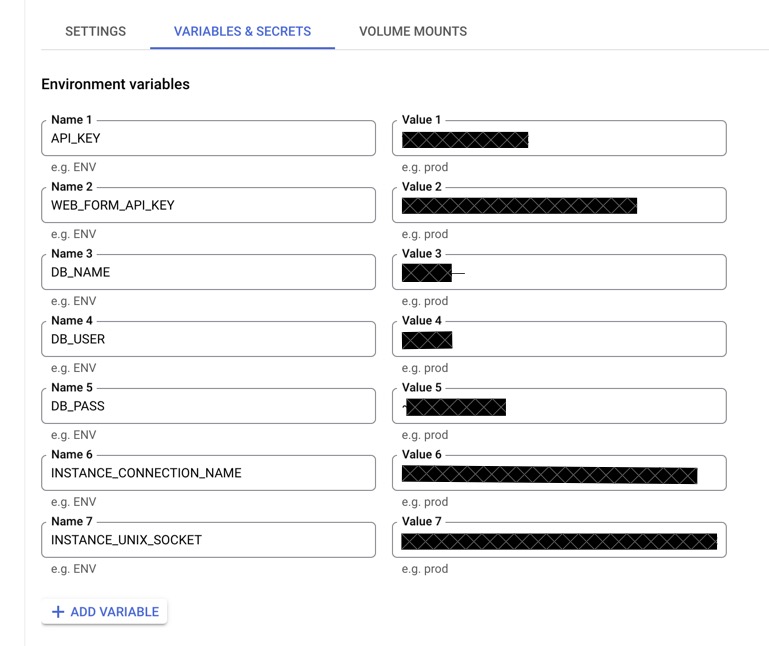
  Move back to the container configuration to find the "VARIABLES & SECRETS" tab. In this tab right now we are focused on the DB_NAME, DB_USER, DB_PASS, INSTANCECONNECTIONNAME, and INSTANCEUNIXSOCKET. These variables are going to create the a postgres connection via unix socket from our Cloud SQL PostgreSQL instance to our Cloud Run container. The INSTANCECONNECTIONNAME should be in the following format "project:region:instance" which can be found in the Cloud SQL instance under the "Connections" pane. The INSTANCEUNIXSOCKET should be almost the same as INSTANCECONNECTIONNAME, but with the following format "/cloudsql/project:region:instance" which is not listed in the Cloud SQL instance information. DB_NAME is in the Cloud SQL instance section under the "Databases" pane. DB_USER is in the Cloud SQL instance section under the "Users" section. DB_PASS you should have saved from earlier when setting up the PostgreSQL instance. Click done and deploy the revision. Note, again this might take a while to build, don't freak out.
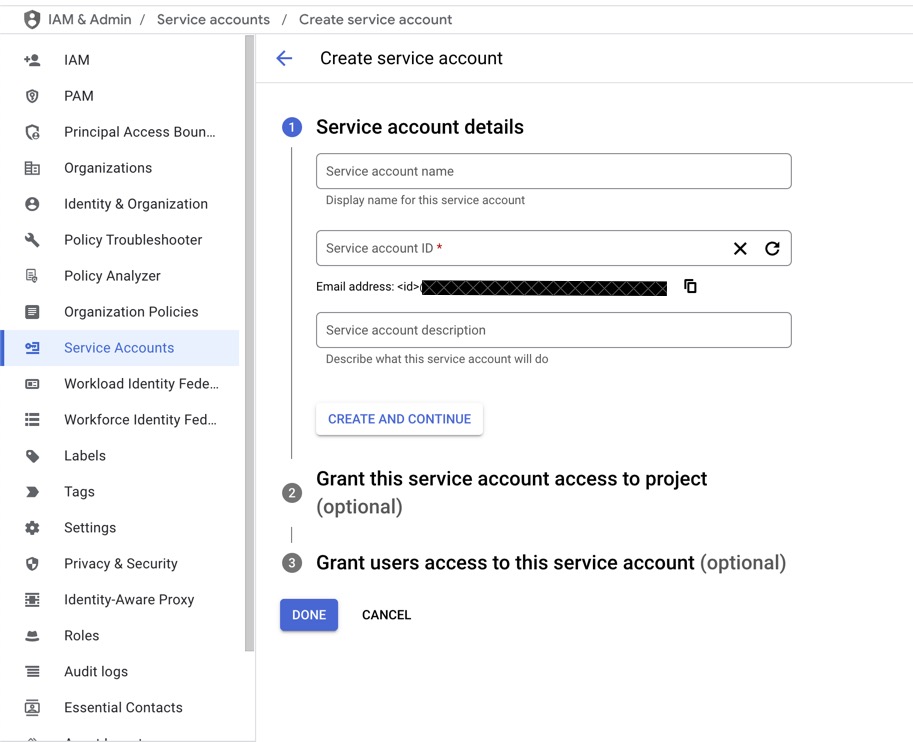
  The last piece in our Google Cloud journey is to set up an IAM service account. This IAM service account will be used for our GitHub action, which will automatically upload our static resources to our Cloud Storage Bucket on a push to the master branch of our repository. Go into the Google Cloud Console and navigate to "IAM & Admin" to get started. Click on the "Service Accounts" pane and set up an account.
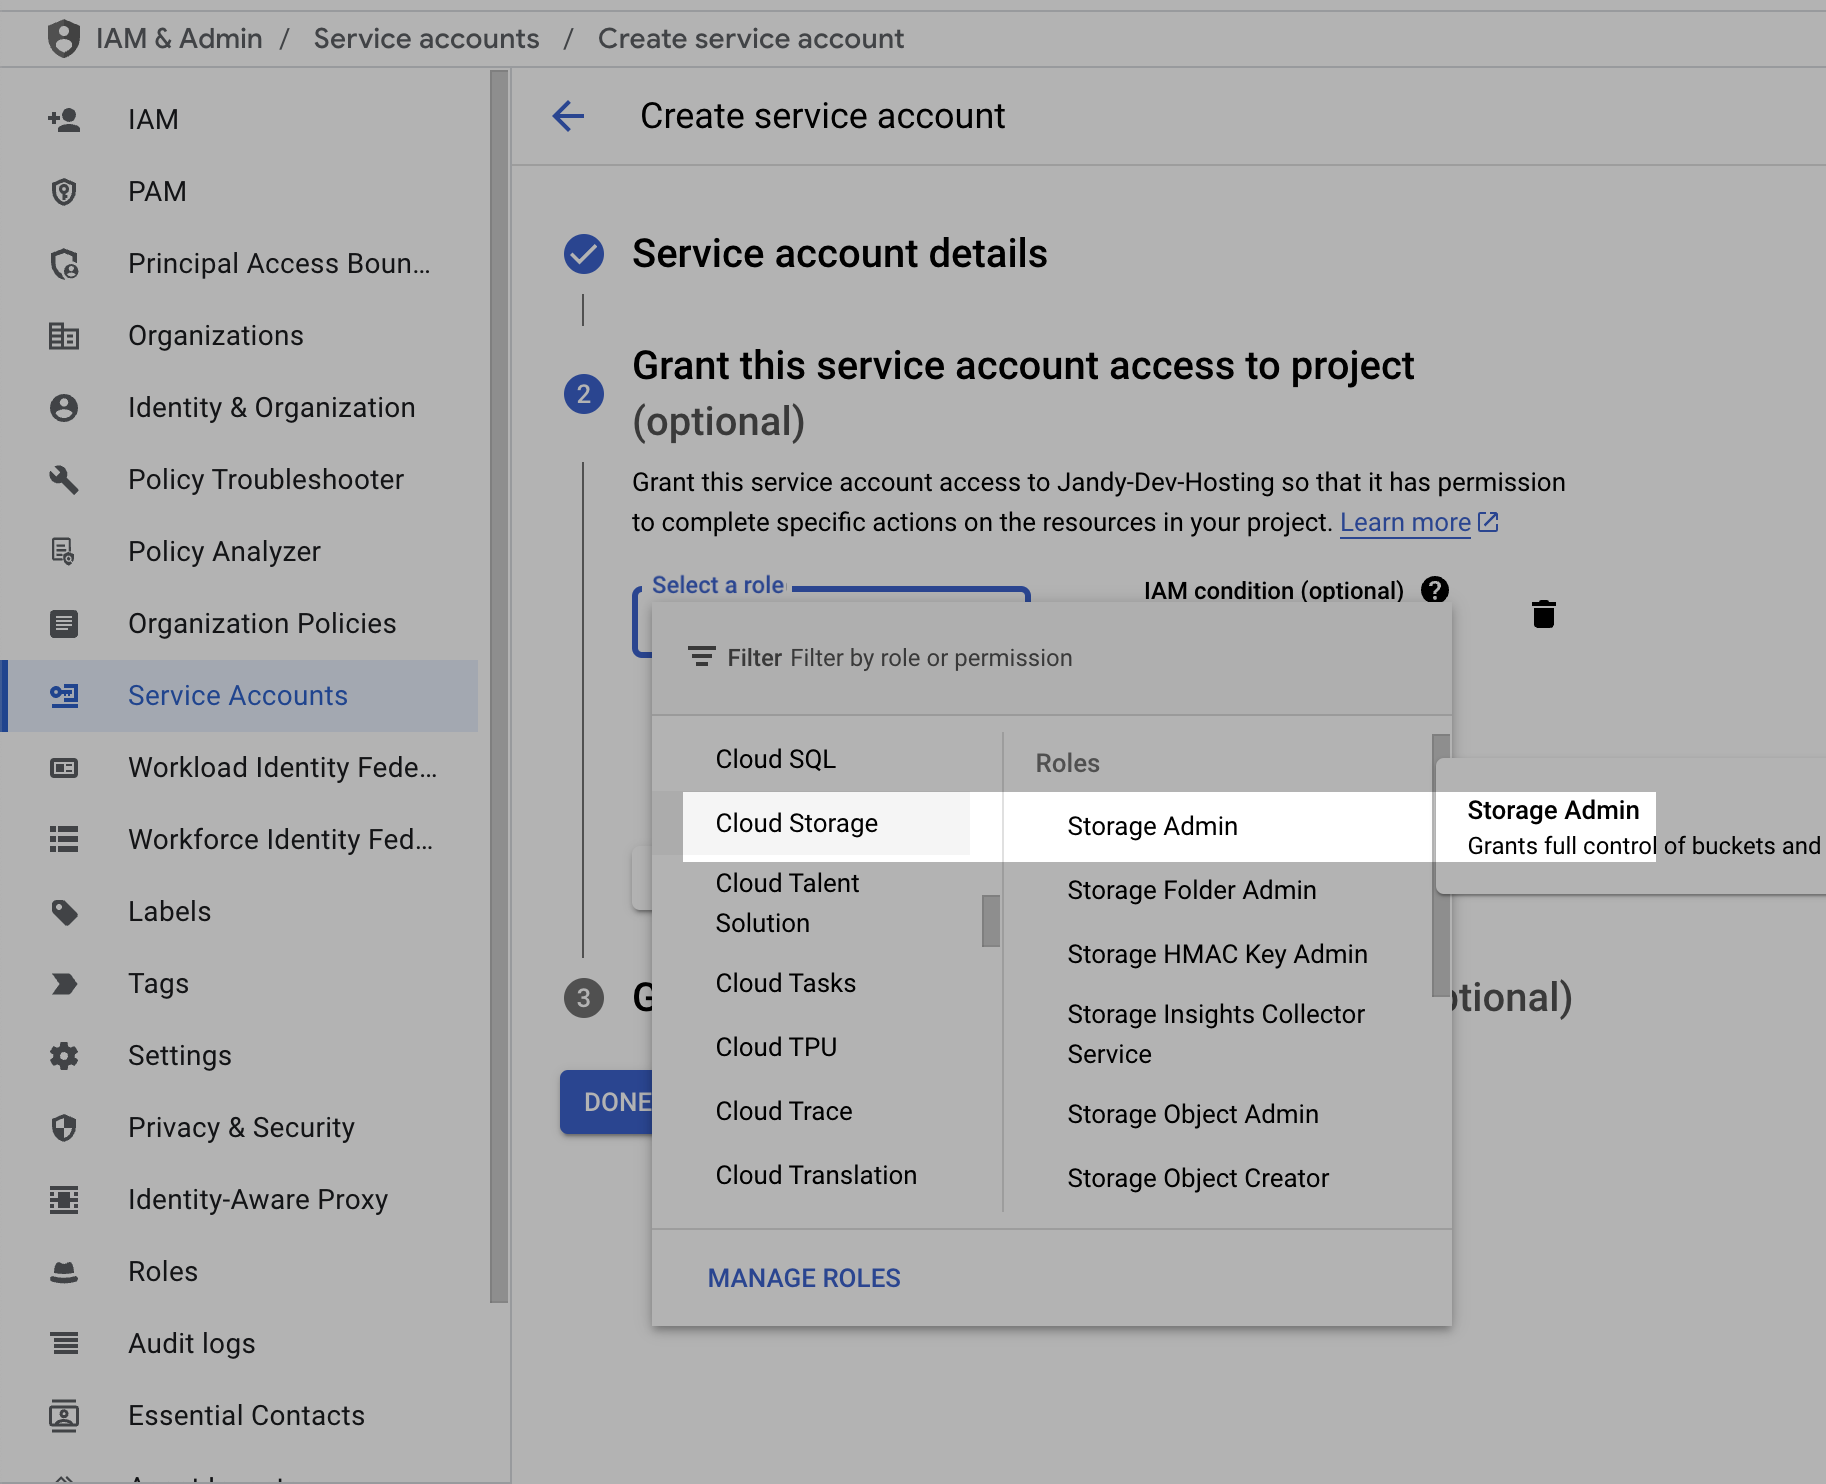
  Once the account is created, you wan to grant the service account access to your Cloud Storage Bucket with the "Storage Admin" role so you can create and delete objects in the bucket. The next step of asigning a user to the service account is optional and should be skipped.
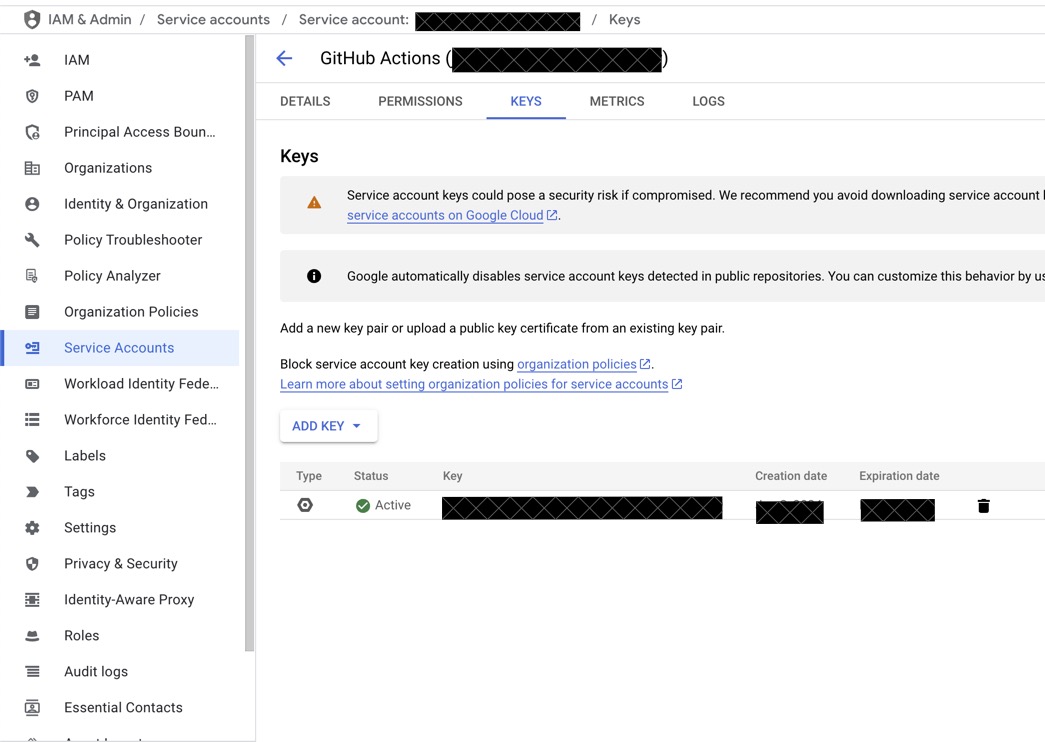
  After the service account populates you want to click on the "KEYS" tab and "ADD KEY" which should be a new JSON key. It should download and save to your computer, you will need this in a second for the GitHub action setup.
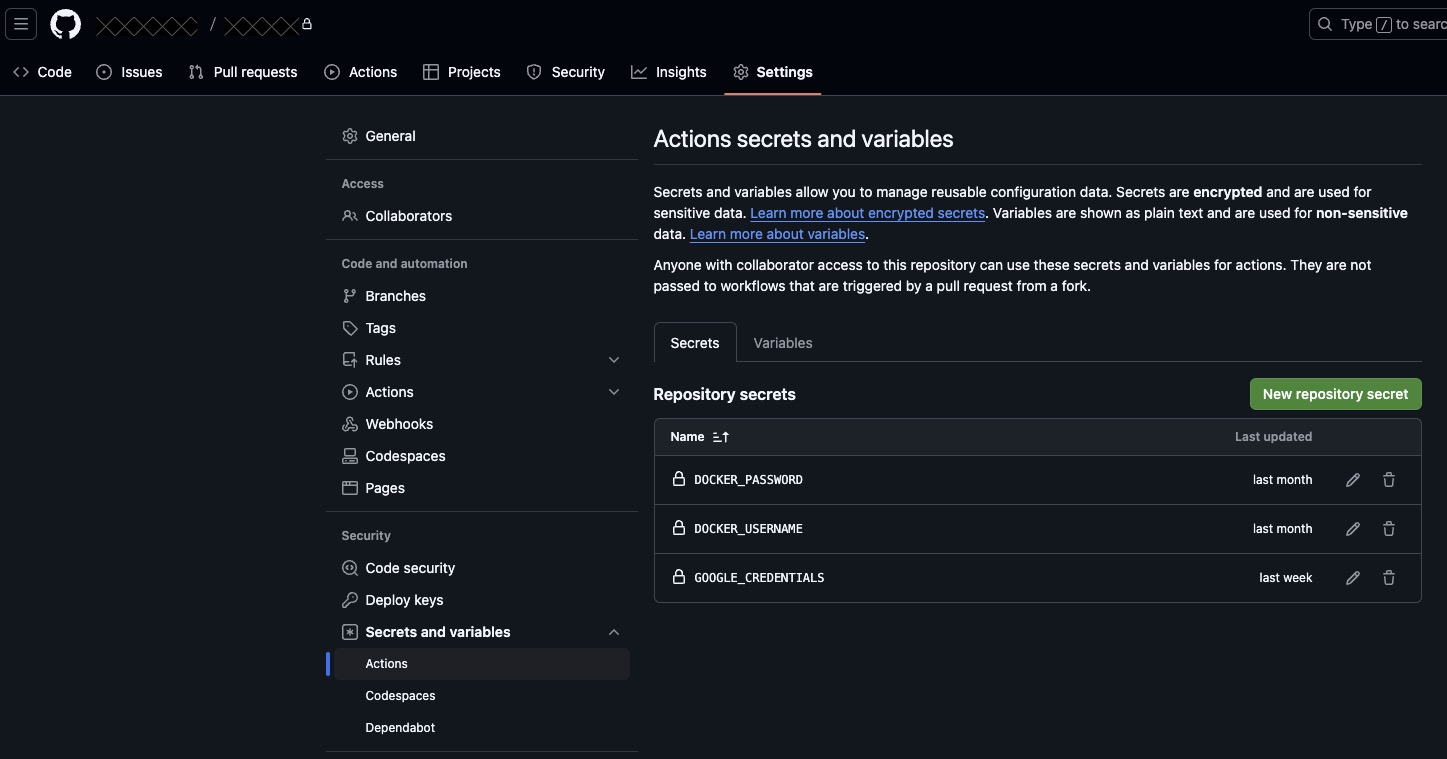
  Navigate to your GitHub repository and go into the "Settings" tab, click on the "Secrets and Variables" dropdown in the security pane, you want to select the "Actions" button. Once there, click the "New repository secret" button to create a secret named "GOOGLE_CREDENTIALS" which we will use in our GitHub action to authenticate to your Cloud Storage Bucket.
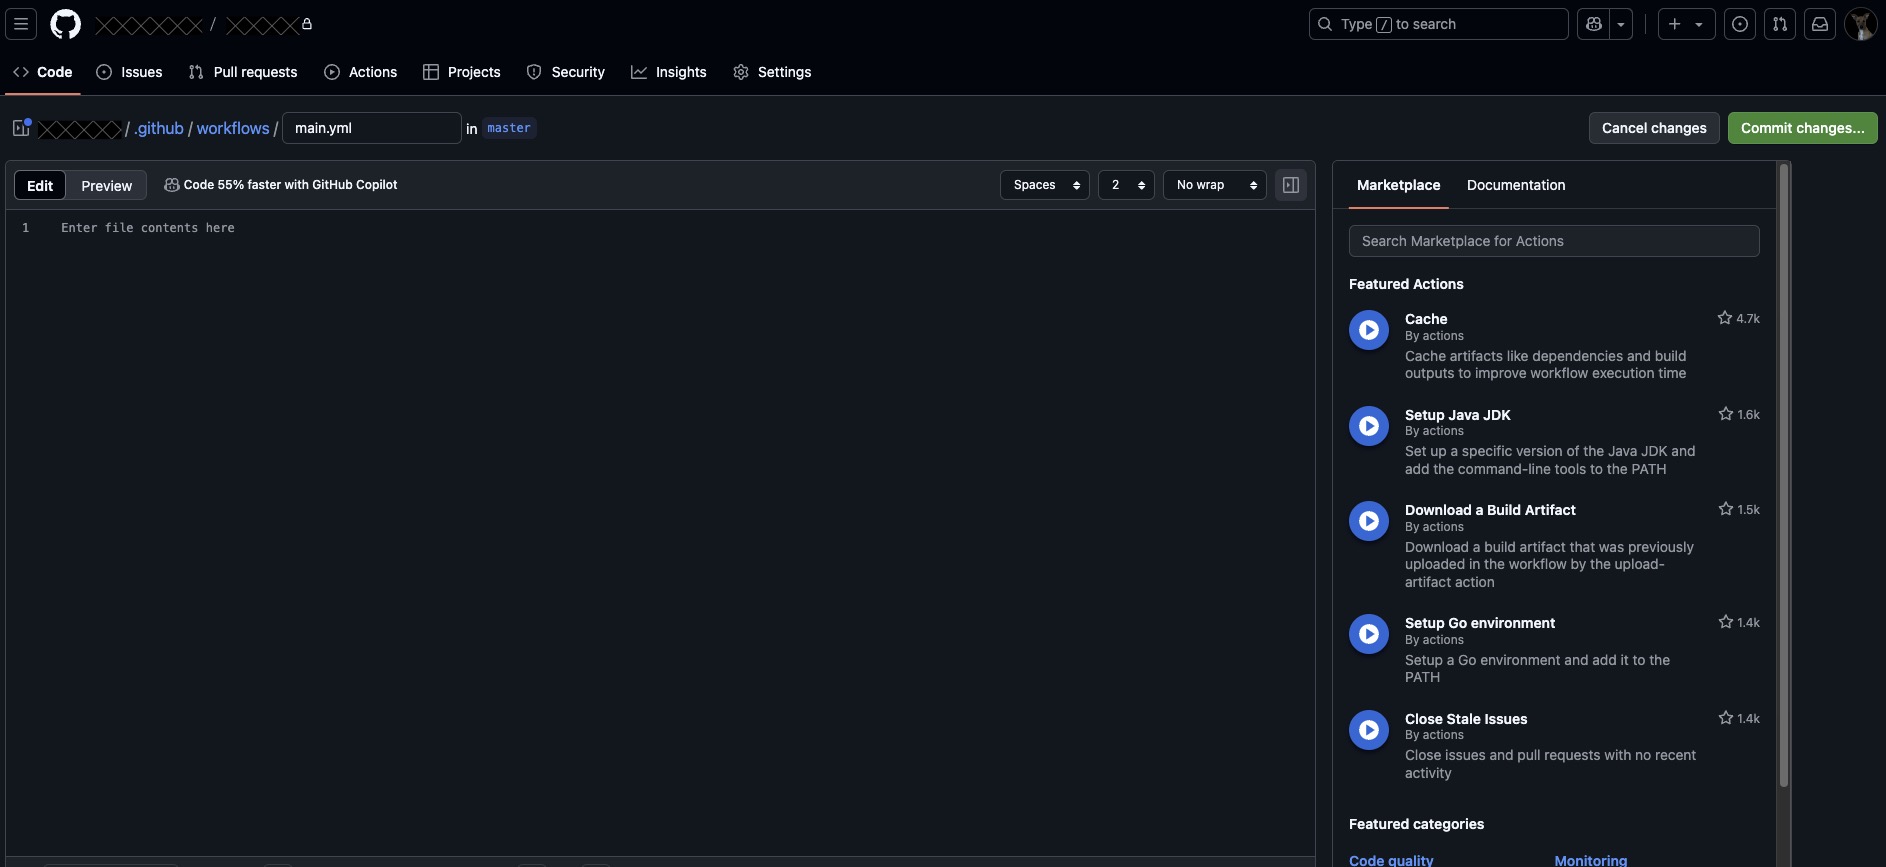
  Now click on the "Actions tab" and create a new workflow. Name this whatever you like I called mine "Cloud Storage Upload" and use the code below as a template for the action. I do not include my images in the action as I upload then upon creation of a blog post which I will cover later in the Vapor and Swift portion of the post. (Link for context, Google Cloud Storage Upload Documentation)
name: Cloud Storage Upload

on:
  push:
    branches:
      - master  # Runs when code is pushed to the master branch

jobs:
  job_id:
    runs-on: ubuntu-latest
    permissions:
      contents: 'read'
      id-token: 'write'

    steps:
    - id: checkout
      uses: actions/checkout@v4

    - id: auth
      uses: google-github-actions/auth@v2
      with:
        credentials_json: '${{ secrets.GOOGLE_CREDENTIALS }}'

    - id: upload-styles-folder
      uses: google-github-actions/upload-cloud-storage@v2
      with:
        path: './Public/Styles'
        destination: 'my-bucket-name-here'
        gzip: false
        headers: |-
          content-type: 'text/css'


    - id: upload-javascript-folder
      uses: google-github-actions/upload-cloud-storage@v2
      with:
        path: './Public/Javascript'
        destination: 'my-bucket-name-here'
        gzip: false
        headers: |-
          content-type: 'application/javascript'
Yes, that was a lot. No it is not finished, but will start to come together once we get Vapor all configured. Your Google Cloud setup is complete, but if you want to test this stuff locally you might want to add access from your IP to the Cloud SQL PostgreSQL instance, go to the "NETWORKING" pane. This will be helpful if you want to connect to your production database and run some queries for testing purposes, I use pgAdmin to test. Another helpful step that I took to troubleshoot my configure.swift to ensure PostgreSQL setup was correct was to utilize Google Cloud SQL Auth Proxy, which let me create a unix socket connection on my machine locally to test a local container running the web app to connect to the production database in the same fashion as the Cloud Run container (Link for context, Cloud Auth Proxy). In order to troubleshoot the Cloud Storage instance, I chose to use Cloud Storage FUSE to mount the Cloud Storage Instance locally. This was a pain to setup and troubleshoot as its not really supported by google for Mac (Link for context, Cloud Storage FUSE). Once you mount the Cloud Storage Bucket locally you can attach it to your local container as a docker volume using a docker-compose.yml file.
Vapor Implementation
In order to get started with linking the Google Cloud resources that we just provisioned and get familiar with how Vapor works we need to check out our Swift Package to make sure we have all the dependencies needed. I included the swift code below, the important packages to note that are non-standard from a base Vapor install are Leaf, Fluent, and Fluent Postgres Driver.
// Package.swift
import PackageDescription

let package = Package(

    name: "ProjectName",
    platforms: [
       .macOS(.v13)
    ],

    dependencies: [
        // 💧 A server-side Swift web framework.
        .package(url: "https://github.com/vapor/vapor.git", from: "4.83.1"),
        // 🍃 An expressive, performant, and extensible templating language built for Swift.
        .package(url: "https://github.com/vapor/leaf.git", from: "4.2.4"),
        // 🐬 Fluent ORM framework for Swift.
        .package(url: "https://github.com/vapor/fluent.git", from: "4.0.0"),
        // 🔵 Swift ORM (queries, models, relations, etc) built on PostgreSQL.
        .package(url: "https://github.com/vapor/fluent-postgres-driver.git", from: "2.0.0"),
        // 🔵 Non-blocking, event-driven networking for Swift. Used for custom executors
        .package(url: "https://github.com/apple/swift-nio.git", from: "2.65.0")
    ],

    targets: [
        .executableTarget(
            name: "App",
            dependencies: [
                .product(name: "Leaf", package: "leaf"),
                .product(name: "Vapor", package: "vapor"),
                .product(name: "Fluent", package: "fluent"),
                .product(name: "FluentPostgresDriver", package: "fluent-postgres-driver"),
                .product(name: "NIOCore", package: "swift-nio"),
                .product(name: "NIOPosix", package: "swift-nio")
            ]
        ),

        .testTarget(name: "AppTests", dependencies: [
            .target(name: "App"),
            .product(name: "XCTVapor", package: "vapor"),
            // Workaround for https://github.com/apple/swift-package-manager/issues/6940
            .product(name: "Vapor", package: "vapor"),
            .product(name: "Leaf", package: "leaf"),
            .product(name: "Fluent", package: "fluent"),
            .product(name: "FluentPostgresDriver", package: "fluent-postgres-driver"),
            .product(name: "NIOCore", package: "swift-nio"),
            .product(name: "NIOPosix", package: "swift-nio")
        ])
    ]
)
Now that you have added the necessary packages into your project, you should build you the project and see the dependencies added. To link all your Google Cloud resources to Vapor, you need to setup the configure.swift file. The configure.swift file is really just a function configure that links all services and resources to your app, entrypoint.swift contains your @main which uses configure to run the app. There a couple of things we want to do in the configure.swift in particular, link the PostgreSQL instance by reading in our environment variables we set on the container earlier. Use Filemiddleware and add a public directory in the default location of "/app/Public," since this is where we mounted the Google Cloud Storage Bucket. Lastly tell our app to use leaf for templating, since it provides a convenient way to display our data.
// Configure.swift
import Leaf
import Vapor
import Fluent
import FluentPostgresDriver

// Configures your application
public func configure(_ app: Application) async throws {
    // Load environment variables
    app.environment = try .detect()

    // Serve files from "/app/Public" directory
    app.middleware.use(FileMiddleware(publicDirectory: app.directory.publicDirectory))

    // Use Leaf for views
    app.views.use(.leaf)

    // Load in Environment Variables for use of Linking Cloud PostgreSQL instance
    guard
        let username = Environment.get("DB_USER"),
        let password = Environment.get("DB_PASS"),
        let databaseName = Environment.get("DB_NAME")
    else {
        fatalError("Missing required environment variables")
    }

    // Use for connection to Cloud PostgreSQL via unix socket
    if let unixSocket = Environment.get("INSTANCE_UNIX_SOCKET") {
        app.databases.use(
            .postgres(
                configuration: .init(
                    unixDomainSocketPath: "\(unixSocket)/.s.PGSQL.5432",
                    username: username,
                    password: password,
                    database: databaseName
                )
            ),
            as: .psql
        )
    } else {
	    // I configured this for local testing, using a SQLite file
    }

    // Run migrations automatically
    try await app.autoMigrate()

    // Register routes
    try routes(app)
}
At this point you should be able to commit or push this code to the master branch or whatever branch you configured the Cloud Run CI/CD pipeline to execute based off. Once the build is complete you should be able to access your site!
Now that I have gone over the basic steps that I used to integrate the Google Cloud resources with the Vapor app, I want to showcase some other pieces specifically related to the development of Jandy.dev.
Blog Functionality and Implementation
One of the goals I set out with when creating this site is to have a blog in which, I should be able to upload images, code, and text. I was going over and experimenting with various ways to accomplish this goal, when suddenly I came across markdown files. The markdown format is easily converted to html with the help of a markdown parser, in my case I chose a package called Ink which significantly reduced complexity. Once the markdown is converted to html, I use a custom leaf template in order to display that html. This is great in theory, but I still have to get this into my database, by creating POST route, a blog post model, and figure out image uploads and linking. I started with creating the model and migration, in order for our database to handle BlogPost objects being stored.
// BlogPost.swift
import Fluent
import Vapor
import Ink

/// A model representing a blog post.
/// This model is stored in the database table named "blogs".
final class BlogPost: Model, Content {
    // Specifies the database table name for this model.
    static let schema = "blog_posts"

    /// The unique identifier for each blog post.
    @ID(key: .id)
    var id: UUID?

    /// The body of the blog post in Markdown format.
    @Field(key: "body")
    var body: String

    /// A string containing tags for the blog post (e.g., comma-separated tags).
    @Field(key: "tags")
    var tags: String

    /// An optional array of strings representing image filenames or URLs associated with the blog post.
    @Field(key: "imageData")
    var imageData: [String]?

    /// A computed property that converts the Markdown content in `body` into HTML.
    /// This is done using the Ink Markdown parser.
    var htmlBody: String {
        // Create a new MarkdownParser instance.
        let markdownParser = MarkdownParser()
        // Parse the Markdown text stored in `body`.
        let result = markdownParser.parse(body)
        // Extract the generated HTML from the parse result.
        let html = result.html
        // Return the HTML string.
        return html
    }

    /// Default initializer required by Fluent.
    init() { }

    /// A custom initializer to create a new BlogPost instance.
    ///
    /// - Parameters:
    ///   - id: Optional UUID for the blog post.
    ///   - body: The Markdown content of the post.
    ///   - tags: The tags associated with the post.
    ///   - imageData: An optional array of image filenames or URLs.
    init(id: UUID? = nil, body: String, tags: String, imageData: [String]?) {
        self.id = id
        self.body = body
        self.tags = tags
        self.imageData = imageData
    }
}

/// A migration to create the "blogs" table for storing blog posts.
struct CreateBlogPost: Migration {
    /// The prepare function runs when the migration is applied.
    /// It defines the schema (table structure) for the "blogs" table.
    func prepare(on database: Database) -> EventLoopFuture<Void> {
        database.schema("blogs")
            .id()  // Creates a primary key column "id" of type UUID.
            .field("body", .string, .required)  // Adds a required string column "body" for the Markdown content.
            .field("tags", .string, .required)  // Adds a required string column "tags" for storing tags.
            .field("imageData", .array(of: .string))  // Adds an optional array column "imageData" to store image filenames/URLs.
            .create()  // Creates the table in the database.
    }

    /// The revert function runs if the migration is rolled back.
    /// It deletes the "blogs" table.
    func revert(on database: Database) -> EventLoopFuture<Void> {
        database.schema("blog_posts").delete()
    }
}
The model contains all the necessary fields in order to create and store a blog post. The imageData field is an optional array of strings, because I realized I only wanted to store the file path to the images that I am including in a blog post and not the images themselves, while accounting for the cases of multiple or no images being contained in a post. The next step was to create a controller that would handle all the functionality that I would expect from the routes. The cases I wanted to account for were get all posts, view a specific post, create a post, delete a post. When creating and deleting blog posts, I wanted to make sure that only I was able to perform these actions, so I created an API key that I stored as an environment variable. When going through the post creation process and creating a couple of sample posts I noticed the issue where I needed to create some unique identifier for the image upload, in this case I chose a date-time string to be appended to the front of the original filename in case I ever named images the same thing. The date-time string helps manual manipulation of images contained in the cloud storage bucket later. Now that the name change has occurred I need to replace the markdown referenced images with the new unique names that were uploaded to the Cloud Storage Bucket. The Ink markdown parser makes this replacement very easy, as demonstrated in the code below.
// BlogPostController.swift
import Vapor
import Fluent
import Ink

/// Controller responsible for handling blog post operations:
/// - Listing all blog posts
/// - Displaying a single blog post (with Markdown-to-HTML conversion)
/// - Creating new blog posts (with image uploads and Markdown processing)
/// - Deleting posts and searching posts
class BlogPostController {

    /// Retrieves all blog posts from the database and renders the "blogs" Leaf template.
    ///
    /// - Parameter req: The incoming request.
    /// - Returns: A future view that displays all blog posts.
    func index(req: Request) throws -> EventLoopFuture<View> {
        return BlogPost.query(on: req.db).all().flatMap { posts in
            // Pass the posts array to the Leaf template as context.
            let context = ["posts": posts]
            return req.view.render("blog_posts", context)
        }
    }

    /// Retrieves a single blog post by its UUID and renders the "view_post" Leaf template.
    ///
    /// - Parameter req: The incoming request.
    /// - Returns: A future view that displays a single blog post.
    func viewPost(req: Request) throws -> EventLoopFuture<View> {
        // Extract the post ID from the URL parameter.
        guard let postID = req.parameters.get("id", as: UUID.self) else {
            throw Abort(.badRequest, reason: "Invalid post ID format")
        }

        // Find the post in the database, throw a 404 if not found.
        return BlogPost.find(postID, on: req.db)
            .unwrap(or: Abort(.notFound, reason: "Blog post not found"))
            .flatMap { post in
                // Create a context that includes the post and the HTML version of its body.
                let context = PostContext(
                    post: post,
                    htmlBody: post.htmlBody  // This property converts Markdown to HTML.
                )
                return req.view.render("view_post", context)
            }
    }

    /// Creates a new blog post.
    ///
    /// The function expects the request to include:
    /// - Markdown text in the `body`
    /// - A string of tags in `tags`
    /// - Zero or more uploaded image files in `files`
    ///
    /// - Parameter req: The incoming request.
    /// - Returns: A future BlogPost after saving it to the database.
    func create(req: Request) throws -> EventLoopFuture<BlogPost> {
        // Check for an API Key header for secure post creation.
        let apiKey = req.headers["X-API-Key"].first
        guard apiKey == Environment.get("API_KEY") else {
            throw Abort(.unauthorized, reason: "Invalid API Key")
        }

        // Define the expected structure of the input JSON.
        struct Input: Content {
            var body: String   // Markdown text to be converted to HTML
            var tags: String   // Comma-separated list of tags
            var files: [File]  // Array of image files (can be empty)
        }

        // Decode the incoming request into our Input structure.
        let input = try req.content.decode(Input.self)

        // Upload images (if any) and update the markdown image references with the new filenames.
        return imageUpload(req: req, files: input.files).flatMap { storedFilenames in
            let updatedHTML = self.replaceImageReferences(in: input.body, with: storedFilenames)

            // Create a new BlogPost with the converted HTML and uploaded image data.
            let blogPost = BlogPost(
                body: updatedHTML,
                tags: input.tags,
                imageData: storedFilenames
            )

            // Save the blog post to the database.
            return blogPost.save(on: req.db).map { blogPost }
        }
    }

    /// Handles uploading image files from the request.
    ///
    /// This function saves each file to the "Public/Images/" directory and collects the new filenames.
    ///
    /// - Parameters:
    ///   - req: The incoming request.
    ///   - files: An array of File objects to upload.
    /// - Returns: A future array of strings containing the new filenames.
    private func imageUpload(req: Request, files: [File]) -> EventLoopFuture<[String]> {
        let directory = "Public/Images/"  // Directory where images are stored
        let allowedExtensions = ["png", "jpeg", "jpg", "gif"]
        var storedFilenames: [String] = []

        // Process each file that meets the allowed extensions and is not empty.
        let fileSaveFutures = files.compactMap { file -> EventLoopFuture<Void>? in
            guard file.data.readableBytes > 0,
                  let fileExtension = file.extension?.lowercased(),
                  allowedExtensions.contains(fileExtension) else {
                return nil
            }

            // Create a unique filename using the current date/time.
            let formatter = DateFormatter()
            formatter.dateFormat = "y-MM-dd-HH-mm-ss-"
            let fileName = formatter.string(from: Date()) + file.filename
            let filePath = directory + fileName
            storedFilenames.append(fileName)

            // Open the file, write the data, then close the file.
            return req.application.fileio.openFile(path: filePath,
                                                   mode: .write,
                                                   flags: .allowFileCreation(posixMode: 0x744),
                                                   eventLoop: req.eventLoop)
                .flatMap { handle in
                    req.application.fileio.write(fileHandle: handle,
                                                 buffer: file.data,
                                                 eventLoop: req.eventLoop)
                        .flatMapThrowing { _ in
                            try handle.close()
                        }
                }
        }

        // Combine all file upload futures and return the stored filenames when done.
        return EventLoopFuture.andAllSucceed(fileSaveFutures, on: req.eventLoop).map { storedFilenames }
    }

    /// Replaces Markdown image references with new filenames.
    ///
    /// This function uses the Ink Markdown parser to modify image references. It looks for Markdown image syntax,
    /// then replaces the image URL with the new filename from the stored filenames array.
    ///
    /// - Parameters:
    ///   - markdown: The original Markdown text.
    ///   - filenames: An array of new filenames from the image upload process.
    /// - Returns: The updated HTML string with new image references.
    private func replaceImageReferences(in markdown: String, with filenames: [String]) -> String {
        var filenameIndex = 0
        var parser = MarkdownParser()

        // Add a modifier to process images in the Markdown.
        parser.addModifier(.init(target: .images) { html, markdown in
            // If we've used up all filenames, return the original HTML.
            guard filenameIndex < filenames.count else { return html }
            let newFilename = filenames[filenameIndex]
            filenameIndex += 1
            // Replace the image reference with a new one pointing to the correct location on the server.
            return "<img src=\"/Images/\(newFilename)\">"
        })

        // Convert the Markdown text to HTML with updated image references.
        let updatedHTML = parser.html(from: markdown)
        return updatedHTML
    }

    /// Deletes a blog post given its ID.
    ///
    /// - Parameter req: The incoming request.
    /// - Returns: A future HTTPStatus indicating success.
    func delete(req: Request) throws -> EventLoopFuture<HTTPStatus> {
        return BlogPost.find(req.parameters.get("id"), on: req.db)
            .unwrap(or: Abort(.notFound))
            .flatMap { $0.delete(on: req.db) }
            .transform(to: .ok)
    }

    /// Searches for blog posts that match the given query in their tags or body.
    ///
    /// - Parameter req: The incoming request.
    /// - Returns: A future view with the search results rendered using the "blogs" Leaf template.
    func search(req: Request) throws -> EventLoopFuture<View> {
        guard let query = req.query[String.self, at: "query"] else {
            throw Abort(.badRequest, reason: "Missing search query")
        }

        return BlogPost.query(on: req.db)
            .group(.or) { group in
                group.filter(\.$tags ~~ query)
                group.filter(\.$body ~~ query)
            }
            .all()
            .flatMap { posts in
                let context = ["posts": posts]
                return req.view.render("blog_posts", context)
            }
    }
}
// ImageUploadResponse.swift
import Vapor

struct ImageUploadResponse: Content {
    let filename: String
    let url: String
}
//BlogPostContext.swift
import Vapor

struct BlogContext: Encodable {
    let posts: [BlogPost]
    let subcategory: String
    let searchQuery: String?
}
struct PostContext: Encodable {
    let post: BlogPost
    let htmlBody: String
}
// APIKeyMiddleware.swift
import Vapor

/// Middleware that checks for a valid API key in incoming requests.
struct APIKeyMiddleware: Middleware {
    /// Called for every request that passes through this middleware.
    ///
    /// - Parameters:
    ///   - request: The incoming HTTP request.
    ///   - next: The next responder in the chain.
    /// - Returns: A future containing the HTTP response.
    func respond(to request: Request, chainingTo next: Responder) -> EventLoopFuture<Response> {
        // Retrieve the first value of the "X-API-Key" header from the request.
        let apiKey = request.headers["X-API-Key"].first

        // Compare the provided API key with the expected API key stored in the environment variable "API_KEY".
        if apiKey == Environment.get("API_KEY") {
            // If the API key matches, forward the request to the next responder in the middleware chain.
            return next.respond(to: request)
        } else {
            // If the API key is missing or doesn't match, fail the request with an unauthorized error.
            return request.eventLoop.makeFailedFuture(Abort(.unauthorized, reason: "Invalid API Key"))
        }
    }
}
Since the BlogController functionality is implemented with the code above, I can add my routes to the routes.swift file.
// routes.swift
func routes(_ app: Application) throws {
    // Create an instance of BlogPostController to handle blog-related endpoints.
    let blogPostController = BlogPostController()
    // GET /blog_posts: Render the view showing a list of all blog posts.
    app.get("blog_posts", use: blogPostController.index)
    // GET /blog_posts/view_post/:id: Render the view for a single blog post by its ID.
    app.get("blog_posts", "view_post", ":id", use: blogPostController.viewPost)
    // GET /blog_posts/search: Render the blog posts view filtered by a search query.
    app.get("blog_posts", "search", use: blogPostController.search)
    // POST /blog_posts: Create a new blog post; this route is protected by APIKeyMiddleware.
    app.grouped(APIKeyMiddleware()).post("blog_posts", use: blogPostController.create)
    // DELETE /blog_posts/:id: Delete a blog post by its ID; also protected by APIKeyMiddleware.
    app.grouped(APIKeyMiddleware()).delete("blog_posts", ":id", use: blogPostController.delete)
}
BlogPost objects are created and stored in our database when we make the POST request but the leaf template still needs to be made for viewing each BlogPost object. I won't be including the CSS for the following blogposts.leaf as this is completely a personal preference and very basic CSS is in my case.*
<!-- blog_posts.leaf -->
<body>
    <!-- Blog Posts Section: This container wraps the entire blog posts area -->
    <div class="section-container">
        <!-- Search Bar: Provides an interface for users to filter blog posts -->
        <div class="search-container">
            <!-- Form to perform a search query via GET method -->
            <form action="/blog_posts/search" method="GET">
                <!-- Text input for the search query; marked as required -->
                <input
                    type="text"
                    name="query"
                    placeholder="Search blog posts..."
                    class="search-bar"
                    required
                />
                <!-- Button to submit the search form -->
                <button type="submit" class="search-button">Search</button>
            </form>
            <!-- Form to clear any applied filters by simply fetching all blog posts -->
            <form action="/blog_posts" method="GET">
                <button type="submit" class="clear-button">Clear Filter</button>
            </form>
        </div>
        <!-- Blog Container: Wraps the blog posts listing -->
        <div class="blog-container">
            <!-- Header for the section -->
            <h6>Recent Blog Posts:</h6>
            <!-- Blog List: Container for iterating over each blog post -->
            <div class="blog-list">
                <!-- Begin Leaf for loop: Iterates through each post in the posts array -->
                #for(post in posts):
                <div class="blog-item">
                    <!-- Display a preview of the blog post's body using a custom Leaf tag -->
                    <p>#preview(post.body)</p>
                    <!-- Link to view the full blog post. The URL includes the post's unique ID -->
                    <a href="/blog_posts/view_post/#(post.id)">Read More...</a>
                    <!-- Display the blog post's tags -->
                    <p><strong>Tags:</strong> #(post.tags)</p>
                </div>
                <!-- Horizontal line to separate posts -->
                <hr>
                <!-- End of the Leaf for loop -->
                #endfor
            </div>
        </div>
    </div>
</body>
I quickly realized after creating a couple of sample blog posts and viewing them on the site, that I needed to cut down on the amount of characters I would display on the page. This is really where the idea to use a custom leaf tag to preview the post came from, with a link to the post being full page. So when we add a custom leaf tag we also have to register it in the configure.swift file before usage.
// PreviewTag.swift
import Vapor
import Leaf

/// An error type for the PreviewTag, used when the required argument is missing.
enum PreviewTagError: Error {
    case noPostBody
}

/// A custom Leaf tag that generates a preview of a blog post's body text.
/// This tag is declared as "unsafe unescaped" so that the output is rendered as raw HTML.
struct PreviewTag: UnsafeUnescapedLeafTag {
    /// Renders the tag based on the provided context.
    ///
    /// The function expects the first parameter in the context to be a string (typically the blog post's body).
    /// It then limits the string to 300 characters and appends "..." if the original text is longer.
    ///
    /// - Parameter ctx: The LeafContext that contains parameters passed to this tag.
    /// - Returns: A LeafData.string containing the preview text.
    /// - Throws: `PreviewTagError.noPostBody` if no string parameter is provided.
    func render(_ ctx: LeafContext) throws -> LeafData {
        // Retrieve the first parameter as a string.
        // If no parameter is present, throw an error indicating that the post body is missing.
        guard let first = ctx.parameters.first?.string else {
            throw PreviewTagError.noPostBody
        }

        // Create a preview by taking the first 300 characters of the input string.
        // If the original text is longer than 300 characters, append "..." to indicate truncation.
        let previewText = first.prefix(300) + (first.count > 300 ? "..." : "")

        // Return the preview text as LeafData.
        // Using UnsafeUnescapedLeafTag means that the string will not be HTML-escaped, and thus
        // any HTML in the previewText will be rendered as-is.
        return LeafData.string("\(previewText)")
    }
}
// configure.swift

public func configure(_ app: Application) async throws {
	// Previous Code Above...

	// Use Leaf for views
	app.views.use(.leaf)
	// Add the custom PreviewTag to leaf
	app.leaf.tags["preview"] = PreviewTag()

	// More Code Below...
}
There is one other unique feature that I wanted to include in the viewing of blog posts and that is syntax highlighting for code blocks that I am including in the posts. That I achieved by using HighlightJS and a CDN (Content Delivery Network) to bring it to life. An important thing to note about using tabs in code blocks is that all browsers interpret this spacing differently, but you can use the CSS property "tab-size" to change the spacing the 4 spaces it should be.
<!-- view_post.leaf -->
<body>
    <div class="section-container">
        <div class="blog-item">
            #unsafeHTML(htmlBody)
            <p><strong>Tags:</strong> #(post.tags)</p>
        </div>
    </div>
</body>
<!-- Syntax Highlighting -->
<script src="https://cdnjs.cloudflare.com/ajax/libs/highlight.js/11.7.0/highlight.min.js"></script>
<script>
    document.addEventListener("DOMContentLoaded", () => {
        hljs.highlightAll();
    });
</script>
This pretty much wraps up the unique functionality of the site. The apps I use on Mac to create the blog content are Insomnia (link for reference, Insomnia) for all API related requests, and Obsidian (link for reference, Obsidian) to create all my markdown files. I hope you enjoyed reading about the site and how it all came together, if you have any further questions please reach out through the About Me section. There is a lot more to be done regarding the site, but I was happy to see this come together and look forward to improving the sites functionality.
Tags: tech, projects